NANOSQUID
← Back to Blog

How to Use FaceTime Camera Effects and Filters on Mac

· Updated
How to Use FaceTime Camera Effects and Filters on Mac

FaceTime on Mac now includes useful camera effects of its own. You can blur your background, improve lighting, stay centered, add animated reactions, and use a virtual background without installing another app. If you want color grading or stylized filters, you can add those with a virtual camera after the built-in options are working.

Quick answer: Start or join a FaceTime video call, then click your own video tile or the Video button in the menu bar. Choose Portrait, Studio Light, Center Stage, Reactions, or Background. The controls you see depend on your Mac, camera, and macOS version.

This guide covers the current controls in macOS, which Macs support them, and when an app such as Xamera is useful.

FaceTime camera effects available on Mac

Apple's built-in effects are more extensive than a simple filter menu:

  • Portrait blurs the background and keeps the visual focus on you.
  • Studio Light dims the background while brightening your face.
  • Edge Light uses the display as a soft light in low-light conditions.
  • Center Stage automatically keeps you in frame as you move.
  • Reactions add animated hearts, balloons, confetti, fireworks, lasers, rain, and thumbs-up or thumbs-down effects.
  • Background replaces your surroundings with a color, a built-in scene, or an image of your own.
  • Desk View shows your face and an overhead view of your desk.
  • Presenter Overlay places you beside or over the content you are sharing.
  • Manual framing lets you zoom, pan, and recenter on supported cameras.

Apple notes that availability varies by camera, Mac model, and macOS version. The current FaceTime User Guide is the best reference if a control listed here does not appear on your Mac.

How to turn on FaceTime effects

On macOS Sonoma 14, Sequoia 15, and Tahoe 26

  1. Open FaceTime and start or join a video call.
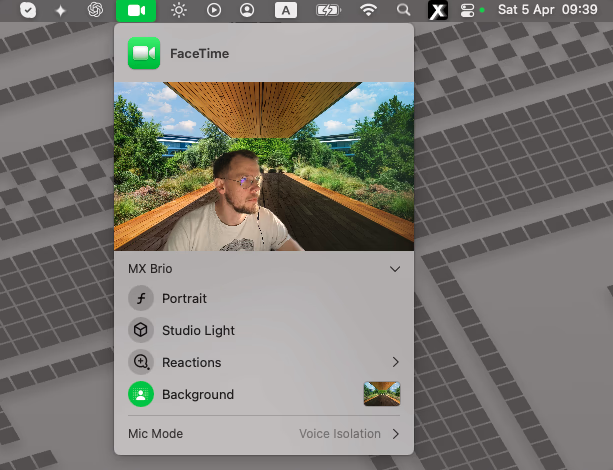
  2. Click your own video tile to reveal the most common effects. You can also click the Video button that appears in the Mac menu bar while your camera is active.
  3. Select Portrait, Studio Light, Center Stage, Reactions, or Background.
  4. If an effect has an arrow beside it, click the arrow to adjust its settings. For example, you can change the strength of Portrait blur or Studio Light.
  5. Open the same menu and click the active effect again when you want to turn it off.

The Video menu normally appears only while FaceTime or another compatible app is actively using the camera. If you are looking at the FaceTime call history rather than an active video call, you may not see it.

The macOS Video menu with built-in camera effects

On macOS Ventura 13

During a call, open Control Center from the menu bar, choose Video Effects, and then select an available effect such as Portrait or Studio Light. Apple moved these controls into the Video menu in macOS Sonoma and later.

What each FaceTime effect does

Blur your background with Portrait mode

Turn on Portrait when you want a natural-looking background blur. On supported versions of macOS, click the arrow next to Portrait and move the slider to change the blur amount.

Portrait mode requires a Mac laptop with Apple silicon using its built-in camera, or a Mac using Continuity Camera with an iPhone XR or later. It is usually the quickest option for a normal call because it preserves your real surroundings while making them less distracting.

Replace your background

Choose Background, then click the background preview to select a color, one of Apple's images, or your own image. Background replacement requires macOS Sequoia 15 or later on a Mac with Apple silicon. It also works with Continuity Camera when using an iPhone 12 or later with iOS 18 or later.

For the cleanest result, use even lighting and avoid clothing that closely matches the wall behind you. A virtual background is disabled while you use the large Presenter Overlay.

Improve difficult lighting

Studio Light dims your surroundings and illuminates your face. It is especially helpful when a window or bright lamp is behind you. Click the arrow next to Studio Light to adjust its intensity.

Edge Light is a newer option for very dark rooms. It uses the edges of your display to illuminate your face and requires a Mac with Apple silicon running macOS 26.2 or later.

Add FaceTime reactions

Turn on Reactions, then either choose an animation from the Video menu or hold a supported hand gesture in view of the camera. FaceTime can show hearts, balloons, a thumbs up, a thumbs down, rain, confetti, fireworks, or lasers.

Gesture recognition can trigger at an awkward moment, so turn Reactions off in the Video menu when you do not want hand gestures to create effects. Reactions require macOS Sonoma 14 or later on a Mac with Apple silicon, or Continuity Camera with an iPhone 12 or later.

Use Center Stage or frame the camera manually

Center Stage follows you and adjusts the frame as you move. Hardware support varies: compatible options include newer MacBook, iMac, and Studio Display cameras, or Continuity Camera with a supported iPhone.

If you would rather keep a fixed composition, turn Center Stage off. On supported cameras, move the pointer over the camera preview in the Video menu to zoom, pan, or recenter manually.

Does FaceTime have color filters on Mac?

FaceTime's built-in tools focus on framing, lighting, background separation, and reactions. They do not provide a library of full-frame color looks comparable to photo filters, nor do they expose detailed controls for exposure, contrast, gamma, vibrance, saturation, hue, and sharpness.

You do not need a third-party app for Portrait blur, Studio Light, Center Stage, reactions, or a standard virtual background. A virtual camera is useful when you specifically want a stylized look, detailed color control, stronger privacy effects, or the same appearance across FaceTime and other meeting apps.

Add custom FaceTime filters with Xamera

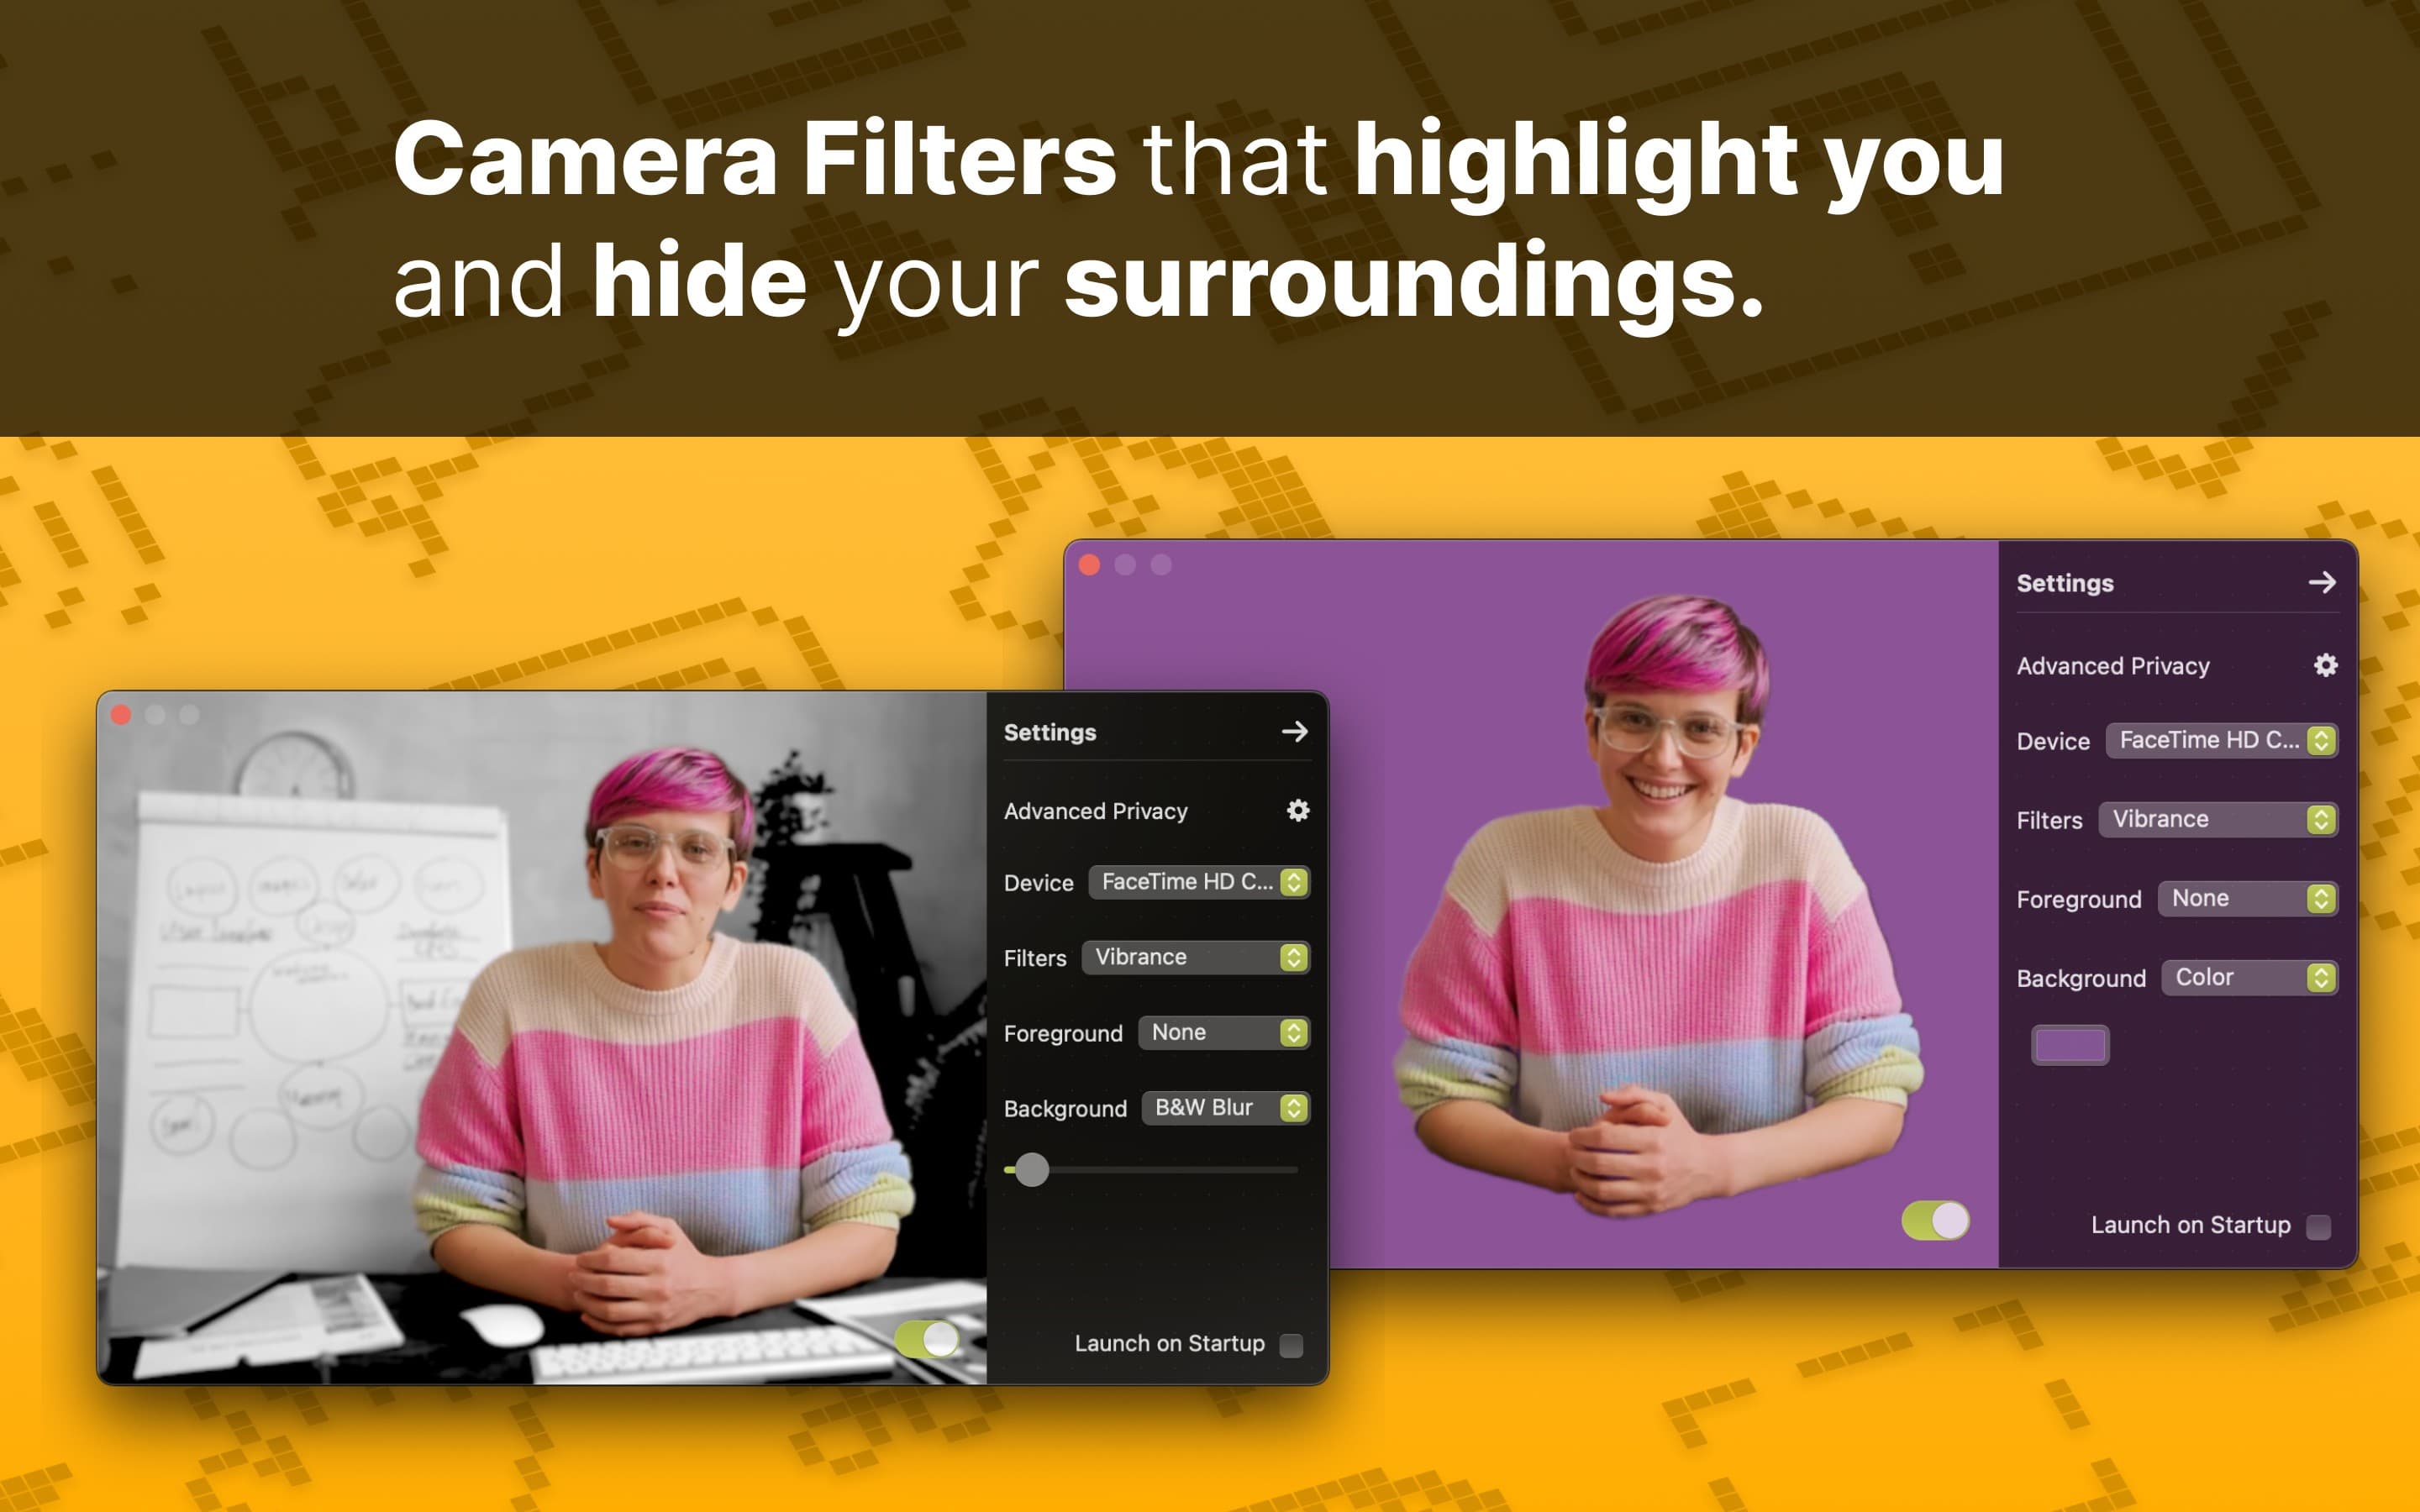
Xamera is a Mac virtual camera that sits between your physical camera and FaceTime. It can apply full-frame filters, color grading, adjustable blur, tint, background replacement, pixelation, dithering, mirroring, zoom, and pan. Because FaceTime receives the processed Xamera feed, the same look can also be used in browsers and meeting apps that accept a virtual camera.

FaceTime using Xamera with a tint and blur effect

Set up Xamera in FaceTime

  1. Download Xamera from the Mac App Store.
  2. Open Xamera and complete its setup, including installation of the Xamera camera extension. The Xamera installation guide covers the extension and permissions step by step.
  3. In Xamera, select the physical camera you want to use and choose your filter, background, blur, or color adjustments.
  4. Open FaceTime. In the Mac menu bar, choose Video, then select Xamera Camera from the camera list.
  5. Check your FaceTime preview and make final adjustments in Xamera before joining the call.

FaceTime remembers camera choices in many cases, but it may switch automatically when another camera is connected. If that happens, open the FaceTime Video menu and select Xamera Camera again. Apple's guide to choosing a FaceTime camera explains the same camera-selection menu.

Built-in FaceTime effects or Xamera?

Use the built-in FaceTime effects when you want:

  • a quick background blur or replacement;
  • automatic framing;
  • better lighting;
  • animated reactions; or
  • no additional software.

Use Xamera when you want:

  • full-frame visual filters or detailed color grading;
  • tint, pixelation, dithering, or other stylized effects;
  • more control over blur and background appearance;
  • a consistent camera look across FaceTime, Safari, Chrome, Zoom, Teams, and Google Meet; or
  • privacy behavior that hides or changes the feed when another person enters the frame.

The two approaches are not mutually exclusive, but stacking background segmentation or lighting effects can produce unnatural edges. Start with one app doing the background work, check the FaceTime preview, and add only the effects that improve the result.

Troubleshooting FaceTime camera effects

The Video button is missing

Start an active FaceTime video call and confirm that your camera is on. The Video button appears in the menu bar while a supported app is using the camera. On Ventura, look in Control Center > Video Effects instead.

Portrait, Background, or another effect is missing

Check your macOS version, Mac model, and selected camera. Some features require Apple silicon or a supported iPhone connected through Continuity Camera. Background replacement specifically requires macOS Sequoia 15 or later.

A reaction appears when you did not intend it

Click the Video button in the menu bar and turn Reactions off. This disables reaction hand gestures in compatible video apps.

Xamera Camera does not appear in FaceTime

Finish the camera extension setup in Xamera, quit and reopen FaceTime, then check the Video menu again. Also confirm that Xamera can access your physical camera. Follow the full installation guide if the extension still is not listed.

The image looks overprocessed

Avoid applying two versions of the same effect. For example, use background blur in either FaceTime or Xamera first, rather than turning both up at once. The same principle applies to lighting and color adjustments.

Frequently asked questions

Can you put a filter on FaceTime on a Mac?

Yes. FaceTime provides built-in Portrait, Studio Light, Center Stage, Reactions, and Background effects on supported Macs. For full-frame color filters and detailed image adjustments, select a virtual camera such as Xamera in FaceTime's Video menu.

Can you change the FaceTime background on Mac?

Yes, on a Mac with Apple silicon running macOS Sequoia 15 or later. During a call, open the Video menu, choose Background, and select a color, built-in image, or your own image. A supported iPhone can also provide the feature through Continuity Camera.

Why are FaceTime effects not showing?

The camera must be active, and each effect has its own hardware and software requirements. Update macOS, start a video call, open the Video menu, and verify that FaceTime is using a supported built-in camera or Continuity Camera.

How do you turn off FaceTime hand reactions?

During a call, click the Video button in the Mac menu bar and turn off Reactions. This prevents supported hand gestures from triggering animated effects.

If you liked this tutorial, check out Xamera Camera for macOS.

Download on the Mac App Store